In a SharePoint list or document library, we can create a calculated field. This field becomes handy when we have to display a formatted/calculated value based on the existing column. We often hear the requirements wherein we have to display a formatted value of the Date column.
Ex., Display only Month value of a date column, display only Month and year part of the date column and so on. Let me show you how we can achieve this:
For this example, create a list having a date field. When you create a list, by default, SharePoint adds two date fields "Modified" and "Created". So you can use any of these columns or you can create a custom Date field.
After creating a list, now create a column of type "Calculated". Under the Formula text box, we need to enter the formula which will fetch us the desired value. In my example, I'm going to use a custom date field "StartDate".
I want to display Month of the StartDate column in 3 characters like Jan, Feb. I'll use the below formula for that:
Now, I want to extend this to display something like this: Jan 2009, Oct 2010. I'll change the formula as:
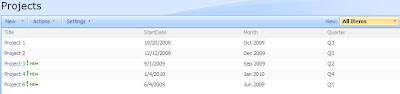
Similarly, we can use calculated column effectively to display formatted data. In my next post, I'm going to show you some more formulae.
Ex., Display only Month value of a date column, display only Month and year part of the date column and so on. Let me show you how we can achieve this:
For this example, create a list having a date field. When you create a list, by default, SharePoint adds two date fields "Modified" and "Created". So you can use any of these columns or you can create a custom Date field.
After creating a list, now create a column of type "Calculated". Under the Formula text box, we need to enter the formula which will fetch us the desired value. In my example, I'm going to use a custom date field "StartDate".
I want to display Month of the StartDate column in 3 characters like Jan, Feb. I'll use the below formula for that:
=TEXT(StartDate,"mmm")Here, second parameter decides the format for the Date.
Now, I want to extend this to display something like this: Jan 2009, Oct 2010. I'll change the formula as:
=TEXT(StartDate,"mmm")&" "&YEAR(StartDate)Let us see one complex formula. I want to calculate Quarter based on the date: Something like Q1, Q2 etc. The formula for this looks something like this:
=IF(AND(MONTH(StartDate)>=10,MONTH(StartDate)<=12),"Q3",IF(AND(MONTH(StartDate)>=1,MONTH(StartDate)<=3),"Q4",IF(AND(MONTH(StartDate)>=4,MONTH(StartDate)<=6),"Q1",IF(AND(MONTH(StartDate)>=7,MONTH(StartDate)<=9),"Q2",""))))This is a nested IF condition using AND logical condition. The output looks something like this:

Similarly, we can use calculated column effectively to display formatted data. In my next post, I'm going to show you some more formulae.
Comments
Post a Comment